Prepare the metadata: how to create metadata from collected data file and modify it
Metadata describe expectations about the data. For the creation of automated data quality assessments using the R package dataquieR, the presence of metadata is not essential, as reports can be created without metadata, but it is highly recommended. The more metadata provided, the more quality checks can be reasonably conducted (see the metadata tutorial for more information).
If metadata are absent, the package can predict them from the study data, but in this way they do not express any expectation that could fail at all. The usefulness of the report is then restricted to descriptive statistics, integrity and completeness checks.
This tutorial provides a guidance on the creation of metadata starting from the collected study data and informs on how to modify metadata with dataquieR.
To follow this tutorial you will need the dataquieR package. Here is the code to install it, if needed.
install.packages("dataquieR")Set up of an example study data
For the creation of metadata, an example study data is needed. This can be created with the following code:
set.seed(7)
sd0 <- data.frame(center = c(rep("Hamburg", 10), rep("Berlin", 10)),
                  id = paste0("ID", 1:20),
                  examiner = c(rep("ex_A", 8), rep("ex_B", 6), rep("ex_B", 6)),
                  height = round(runif(20, 158, 195), digits = 1),
                  weight = round(runif(20, 56, 90), digits = 2))
sd0
How to create metadata using the function
prep_study2meta and modify them
Now that we have an example study data, the function
prep_study2meta() in dataquieR can be used to create a
metadata file from the study data. This function creates the
item_level metadata, which is already formatted with the
right column names.
library(dataquieR)
my_metadata <- prep_study2meta(study_data = sd0)
head(my_metadata)
You can then easily modify the obtained file.
For example we can decide to add admissible ranges for numerical variables (also defined hard limits).
# Add hard limits for the variable "height"
my_metadata$HARD_LIMITS[my_metadata$VAR_NAMES == "height"] <- "[50;250]"
head(my_metadata)
If you want you can also save the obtained file as an Excel document and modify it manually.
# if you want you can save the obtained item_level metadata in your folder
export(my_metadata, "~/Desktop/my_metadata.xlsx")
How to create metadata using the function
prep_create_meta_data_file
The function prep_create_meta_data_file() in dataquieR
can also be used to create a metadata file from the study data. This
function will create all the spreadsheets for the metadata levels, but
only the item_level will be automatically filled based
on the information guessed from your study data.
library(dataquieR)
prep_create_meta_data_file(study_data = sd0,
                           file_name = "~/Desktop/metadata_example_sd0.xlsx")
The Excel file will be created but you will then have to check and modify the metadata file. The item_level will look as follow:
The other metadata levels are filled based on our example data to give an idea of the information needed. You can remove all of them or modify them as needed. The report can still be created even without the other metadata levels, just with item_level metadata. See the metadata tutorial for more information.
The essential information in the metadata that can not be missing are:
- the variable names (column
VAR_NAMES), - the type of data (column
DATA_TYPE), and - the statistical data type of the variable (column
SCALE_LEVEL)
Create metadata starting from predicted metadata in a report
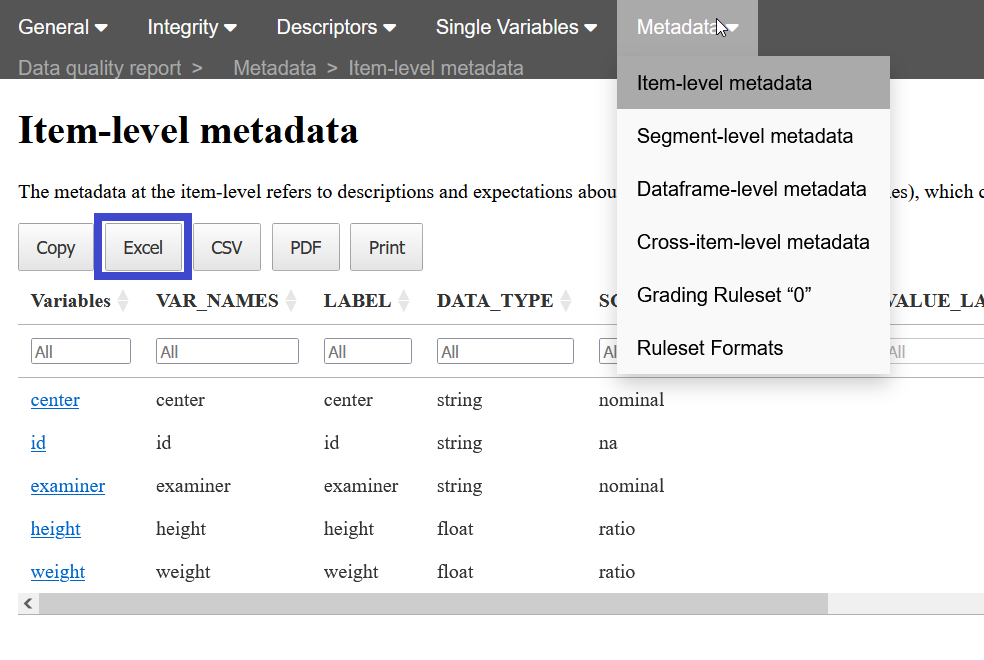
Metadata can be downloaded from a report. You can create a report without metadata and then download the item_level metadata guessed from the study data. To do so, open the Metadata menu, and select the Item_level metadata. Then click on the button “Excel” (surrounded by a blue square in the following image) to automatically download it.

Modify metadata
A function in dataquieR (prep_add_to_meta()) allows to
add variables characteristics to the item_level metadata.
For example you can add a new variable in the study data we created at the beginning of this tutorial, as follows.
# Add a new variable in the study data
sd0_new_col <- data.frame(age = round(runif(20, 18, 75), digits = 0))
sd0 <- cbind(sd0, sd0_new_col)
sd0
To update the metadata you will need to import the metadata file and
then modify it adding the information on the new variable “age”.
Hereafter, there is an example on how to do it using the function
prep_add_to_meta()
#Import the metadata file just created
prep_load_workbook_like_file("~/Desktop/metadata_example_sd0.xlsx")
# you may need to modify the path depending on the location of the file
md0 <- prep_get_data_frame("item_level")

md0 <- prep_add_to_meta(VAR_NAMES = "age",
                        DATA_TYPE = "integer",
                        LABEL = "AGE",
                        VALUE_LABELS = NA,
                        STUDY_SEGMENT = "INTRO",
                        meta_data = md0)
md0


